Application Settings Programming Guide
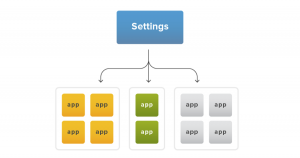
App settings management allows you to provide a layout of key / value pairs that can be synced to our website. You can create your own views or use those developed by MokiManage. The ASM module of the MokiManage SDK provides a consistent way for an administrator to control settings for apps across multiple devices from a single, centralized location. ASM enables developers to specify the settings that they want in their apps, and it then allows those settings to be remotely managed. For example, you could use ASM to create a setting to control or update content in your mobile app, and you could use ASM to manage that setting across an entire fleet of devices.
ASM provides a consistent way to manage settings for mission-critical apps. Often there needs to be a way to apply settings to fleets of devices at once, rather than making changes on-site, one at a time. ASM makes the following three things possible for mission critical apps:
- A consistent way of handling settings and values.
- Centralized settings management. A way to go to a Web page, define a number of settings, and then have those become active for your app across many devices.
- An option for changing the app settings from the app itself. Ideal for immediate changes directly on that one device
This section describes how to create your settings schema file, how to activate ASM, and how to update your schema file.
Creating the Settings Schema
Defining a settings schema for your app is the first step to take when implementing ASM. The settings schema defines what settings values you want to expose and determines the relationship between those settings.
The settings schema is expressed in a JSON file, which you will include with your app. Your SettingsSchema.json file begins by declaring its version and groups. As you work on your SettingsSchema.json file, use pro.jsonlint.com to check and correct the syntax of your file. The API does not check for valid JSON, but does log errors so that you can know where something went wrong.
We will use example values to illustrate how each control should be defined. Replace these values with your application’s values.
Groups
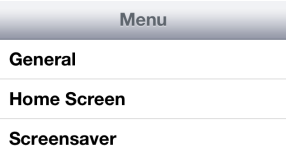
We will create three groups to start our SettingsSchema: General, Home Screen, and Screensaver.
{
    "Version": 1,
    "Groups": [
        {
            "Title": "General",
            "Settings": []
        },
        {
            "Title": "Home Screen",
            "Settings": []
        },
        {
            "Title": "Screensaver",
            "Settings": []
        }
    ]
}
The image below is the UI output for your schema in iOS. Additional coding is required for the menu bar at the top:
Header
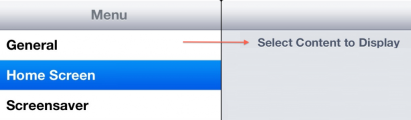
Next, we will add a header to the “Home Screen” group.
{
    "Version": 1,
    "Groups": [
        {
            "Title": "General",
            "Settings": []
        },
        {
            "Title": "Home Screen",
            "Settings": [
                {
                    "Type": "Header",
                    "Title": "Select Content to Display"
                }
            ]
        },
        {
            "Title": "Screensaver",
            "Settings": []
        }
    ]
}
This is what that code will now look like in the app. Please note that additional coding is required for the menu to be highlighted when selected.
Pane
A pane provides a way of nesting additional settings, or having additional options for a specific setting. Because a pane is a secondary level of organization we will show the pane control organizer underneath the ComboBox Controls section below.
List
A list is a type of control, but since a list contains additional controls it can also be classified as a Control Organizer. We will demonstrate a list in the List Controls section below.
Controls
Controls are where you will start to define what is displayed in the app.
TextField
In this example, we are going to add a TextField to the “Home Screen” group. With the optional class “Value” added, dots will display instead of text.
{ “Version”: 1, “Groups”: [ { “Title”: “General”, “Settings”: [] }, { “Title”: “Home Screen”, “Settings”: [ { “Type”: “Header”, “Title”: “Select Content to Display” }, { “Type”: “TextField”, “Title”: “Admin Password”, “Value”: “”, “Class”: [ “Password” ], “Key”: “adminPassword” } ] }, { “Title”: “Screensaver”, “Settings”: [] } ] }

ToggleSwitch
We will now add a ToggleSwitch to the “Home Screen” group that will allow them to show/hide the progress indicator.
{
    "Version": 1,
    "Groups": [
        {
            "Title": "General",
            "Settings": []
        },
        {
            "Title": "Home Screen",
            "Settings": [
                {
                    "Type": "Header",
                    "Title": "Select Content to Display"
                },
                {
                    "Type": "TextField",
                    "Title": "Admin Password",
                    "Value": "",
                    "Class": [
                        "Password"
                    ],
                    "Key": "adminPassword"
                },
                {
                    "Type": "ToggleSwitch",
                    "Title": "Progress Indicator",
                    "Value": true,
                    "Key": "progressIndicator"
                }
            ]
        },
        {
            "Title": "Screensaver",
            "Settings": []
        }
    ]
}
This is what that code will look like in the app settings view:

ComboBox
We will add a ComboBox to the “Home Screen” group to have the device reset itself if idle for one or two minutes. We will set the default value at 2 minutes.
{
    "Version": 1,
    "Groups": [
        {
            "Title": "General",
            "Settings": []
        },
        {
            "Title": "Home Screen",
            "Settings": [
                {
                    "Type": "Header",
                    "Title": "Select Content to Display"
                },
                {
                    "Type": "TextField",
                    "Title": "Admin Password",
                    "Value": "",
                    "Class": [
                        "Password"
                    ],
                    "Key": "adminPassword"
                },
                {
                    "Type": "ToggleSwitch",
                    "Title": "Progress Indicator",
                    "Value": true,
                    "Key": "progressIndicator"
                },
                {
                    "Type": "ComboBox",
                    "Title": "Idle Reset Time",
                    "Class": [
                        "Single"
                    ],
                    "Value": "2",
                    "Options": [
                        {
                            "Title": "1 Minute",
                            "Value": "1"
                        },
                        {
                            "Title": "2 Minutes",
                            "Value": "2"
                        }
                    ],
                    "Key": "duration"
                }
            ]
        },
        {
            "Title": "Screensaver",
            "Settings": []
        }
    ]
}
This is what that code will look like in the app settings view:
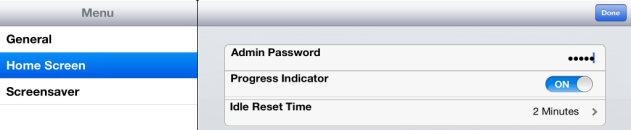
Touching the Idle Reset Time will open the options menu as seen below:

Pane
We will add a pane to the “Home Screen” group and underneath the “ComboBox” section. The pane will have additional settings such as a “TextField” for the URL and a “ToggleSwitch” to have the option of caching the video on the tablet.
{
    "Version": 1,
    "Groups": [
        {
            "Title": "General",
            "Settings": []
        },
        {
            "Title": "Home Screen",
            "Settings": [
                {
                    "Type": "Header",
                    "Title": "Select Content to Display"
                },
                {
                    "Type": "TextField",
                    "Title": "Admin Password",
                    "Value": "",
                    "Class": [
                        "Password"
                    ],
                    "Key": "adminPassword"
                },
                {
                    "Type": "ToggleSwitch",
                    "Title": "Progress Indicator",
                    "Value": true,
                    "Key": "progressIndicator"
                },
                {
                    "Type": "ComboBox",
                    "Title": "Idle Reset Time",
                    "Class": [
                        "Single"
                    ],
                    "Value": "2",
                    "Options": [
                        {
                            "Title": "1 Minute",
                            "Value": "1"
                        },
                        {
                            "Title": "2 Minutes",
                            "Value": "2"
                        }
                    ],
                    "Key": "duration"
                },
                {
                    "Type": "Pane",
                    "Title": "Media Settings",
                    "Settings": [
                        {
                            "Type": "TextField",
                            "Title": "Media URL:",
                            "Value": "",
                            "Key": "mediaUrl"
                        },
                        {
                            "Type": "ToggleSwitch",
                            "Title": "Cache media on the tablet",
                            "Value": false,
                            "Key": "cacheKey"
                        }
                    ]
                }
            ]
        },
        {
            "Title": "Screensaver",
            "Settings": []
        }
    ]
}
This is what that code will look like in the app settings view:

When the Media Settings is selected, this is what that code will look like in the app settings view:

List
We will add a list to the “Screensaver” group and create the settings for the screensaver.
{
    "Version": 1,
    "Groups": [
        {
            "Title": "General",
            "Settings": []
        },
        {
            "Title": "Home Screen",
            "Settings": [
                {
                    "Type": "Header",
                    "Title": "Select Content to Display"
                },
                {
                    "Type": "TextField",
                    "Title": "Admin Password",
                    "Value": "",
                    "Class": [
                        "Password"
                    ],
                    "Key": "adminPassword"
                },
                {
                    "Type": "ToggleSwitch",
                    "Title": "Progress Indicator",
                    "Value": true,
                    "Key": "progressIndicator"
                },
                {
                    "Type": "ComboBox",
                    "Title": "Idle Reset Time",
                    "Class": [
                        "Single"
                    ],
                    "Value": "2",
                    "Options": [
                        {
                            "Title": "1 Minute",
                            "Value": "1"
                        },
                        {
                            "Title": "2 Minutes",
                            "Value": "2"
                        }
                    ],
                    "Key": "duration"
                },
                {
                    "Type": "Pane",
                    "Title": "Media Settings",
                    "Settings": [
                        {
                            "Type": "TextField",
                            "Title": "Media URL:",
                            "Value": "",
                            "Key": "mediaUrl"
                        },
                        {
                            "Type": "ToggleSwitch",
                            "Title": "Cache media on the tablet",
                            "Value": false,
                            "Key": "cacheKey"
                        }
                    ]
                }
            ]
        },
        {
            "Title": "Screensaver",
            "Settings": [
                {
                    "Type": "List",
                    "Title": "Settings",
                    "Key": "screesaverPlaylist",
                    "ItemTemplate": [
                        {
                            "Type": "TextField",
                            "Title": "Content",
                            "Value": "",
                            "Placeholder": "http://",
                            "Key": "content"
                        },
                        {
                            "Type": "ToggleSwitch",
                            "Title": "Cache",
                            "Value": false,
                            "Key": "cacheKey"
                        },
                        {
                            "Type": "TextField",
                            "Title": "Duration (seconds for image to be displayed)",
                            "Value": "",
                            "Key": "duration"
                        }
                    ]
                }
            ]
        }
    ]
}
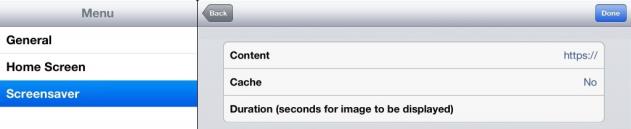
This is what that code will look like in the app settings view:

This is the list control/control organizer. You will notice that the Cache ToggleSwitch just says “no.” This is because we decided to make these items only editable from the MokiManage.com console.
Updating the Settings Schema
When you make changes to your SettingsSchema.json file, update the version at the beginning of the SettingsSchema so that the MokiManage platform knows you’ve made a change. Increment the version attribute by 1, as it is just an integer.
"Version": 2,
This change will notify the MokiManage console to make a schema change. If you make a schema change, and don’t increment your version number, your changes will be ignored.
Enabling ASM
In the Getting Started Guide, the example code instructs you to set ENABLE_AppSettingsManagement to FALSE when you initialize the MokiManage.sharedInstance inside of the onCreate() method in your CustomApplication.java file. In order to enable ASM, you need to ensure your SettingsSchema.json is included in your Android project and change the value of ENABLE_AppSettingsManagement to TRUE.
public class CustomApplication extends Application {
	 private MokiManage mokiManage;
	 private static final String API_KEY = "whatever-your-apik-eyis-useitherenow";
	 private static final boolean ENABLE_AppSettingsManagement = true;
	 private static final boolean ENABLE_AppEnvirionmentManagement = true;
	 @Override
	 public void onCreate() {
	    super.onCreate();
	    mokiManage = MokiManage.sharedInstance(API_KEY, this, ENABLE_AppSettingsManagement, ENABLE_AppEnvirionmentManagement);
	}
}
Using the Default ASM Views
Your app can present a view to allow the operator to change the app’s settings on the device or remotely via MokiManage.com. The SDK automatically generates this interface at your app’s request.
It’s up to you how you present the option of displaying the app’s settings. You may have a secret gesture, like tapping seven fingers on the screen concurrently, or present a settings control somewhere in your app.
To display the view hierarchy, declare the following intent and start the activity:
Intent intent = new Intent(this, AppSettingsActivity.class);
startActivity(intent);
Additional ASM Examples
When your settings schema works, and your app delegate is working with MokiManage.com, you’re ready to start working with settings. Any view controllers that need to access the MokiManage object can do so by accessing the object in the app delegate.
The following MokiManage object methods allow your app to initiate getting and changing settings:
public JSONObject getSettings()
public void saveSettings()
public void saveSettings(JSONObject settings)
The following Broadcasts are sent to notify you when settings are successfully saved to and updated from the web:
MokiManage.SETTINGS_PUSH_COMPLETED_NOTIFICATION
MokiManage.SETTINGS_PULL_COMPLETED_NOTIFICATION
You can get and change settings for your app. You can retrieve all of your settings from the MokiManage object with the method:
public JSONObject getSettings()
This method simply returns the entire settings dictionary from the MokiManage object. You could assign a pointer to these settings, as follows:
JSONObject settingsJson = MokiManage.sharedInstance().getSettings();
Assuming the MokiManage object has already pulled settings, settings returns a dictionary representing your settings. You could assign a pointer to these settings, as follows:
JSONObject settingsJson = MokiManage.sharedInstance().getSettings();
This dictionary has two keys. The Version key returns the version of your schema. You can use this to see if MokiManage is using the latest changes in your SettingsSchema.json file. The Values key returns the set of values, so getting to your settings would look like this:
JSONObject valuesJson = settingsJson.optJSONObject(MokiManage.ASM_KEY_VALUES);
The key-value pairs in this dictionary will match the keys in your schema. For example, the dictionary tied to our Control Examples SettingsSchema.json file would have the keys: adminPassword, ProgressIndicator, duration, cache_key, screensaverPlaylist, and content. Use the key you defined in your SettingsSchema file to access individual settings. Arrays in the JSON settings file are represented as arrays in Objective C as well, so getting the list of announcements would be done with the following line of code:
JSONArray announcements = valuesJson.optJSONArray("announcements");
This is a JSONArray of JSONObjects, with each object representing the settings declared in the list’s ItemTemplate array. The key for each entry is the same as the key for each setting declared.
What you do with these settings depends on your app’s functionality.
You can skip the previous steps and retrieve individual values with these typeForKey methods:
public boolean boolForKey(String key)
public float numberForKey(String key)
public String stringForKey(String key)
public JSONArray arrayForKey(String key)
Click to see a full list of Object Methods.